Subaru WRX Forum banner

The 100% CORRECT, Multi-picture, Non-ghetto, STI I/C sprayer installation

88K views 43 replies 20 participants last post by  Buzzle  
#1 · (Edited)
This spot is reserved for an all-inclusive Youtube video (to be filmed shortly) detailing all aspects, functions, parameters, and metered performance advantages of a full STI intercooler sprayer system transplanted into a 2006 WRX.

Please continue reading the below picture thread to see a detailed description of the complete (and correct) installation.

EDIT - 11 Jan, 2011: With as cold as it is outside (10-15 degrees), the I/C spayer has virtually no effect on the intake temp, as it is already, literally freezing. I will still do a video. My plan is to do a 50-80mph 5th gear pull and time it.... then do a 2nd pull after the I'c has been sprayed, while using my pre and post I/C intake temp gauges as a guide. Should be a good video, but it will have to wait until it gets warmer.
 
#2 · (Edited)
I have been collecting parts and doing research on this for nearly 2 months. You would be absolutely AMAZED to discover how much bad, or incorrect information there is out there. I’ve found that most pictoral threads detailing I/C sprayer systems are either:

1. High $$$, elaborate, custom systems
2. Completely ghetto, non-properly functioning garbage

I’ve found that there is almost ZERO information on how to do an actual transplant of a 100% factory STI I/C sprayer system into a WRX… the RIGHT way. Not jimmy-rigged, not ghetto, with all correct parts, installed correctly, and functioning properly. Again… I researched EVERYTHING out there, and over 90% of it is completely wrong, or not worth doing.
So, before I begin, I thought I’d go ahead and clear up several misconceptions I managed to discover, usually the hard way.

1. The intercooler sprayer SWITCH should NOT be grounded. (trust me, it’s correct)
2. You need the STI spray timer relay to get the 2-3 second burst
3. Running pump power through the switch by “holding” the switch down will burn out the internal light
4. The Subaru schematics ARE correct, but they are MIRROR images of how the plugs actually look.

First things first, lets start with all the parts I used:

4-way wire:
Image


LEDs (I’ll explain why in the instructions)
Image


STI I/C switch:
Image


Side view:
Image


The switch prongs:
Image


STI trunk carpet
Image


STI I/C sprayer tank and pump:
Image


Sprayer tank prongs
Image


Various electrical supplies
Image


STI spray timer relay (Subaru part # 88017FE040)
Image


Relay prongs:
Image


3/16 “L” tubes
Image


Special female wire terminals (NAPA part # 725273)… be warned, they are $1.40 a piece. You need 9 of them, but you should get several extra
Image


STI sprayer nozzle (Subaru part # 86636FA120)
Image


3/16 ID tubing – 20 ft
Image


STI sprayer check valve (Subaru part # 86634AG010)
Image


Standard size insulated female wire terminals
Image


A few other items were required that I had on hand – standard stuff, vampire clips, electrical tape, and LOTS of zip ties, etc.
 
#3 · (Edited)
Now…. Onto the installation. First off, I had several goals that I wanted to achieve in addition to just having a sprayer system:

1. I wanted it to function EXACTLY like the factory STI system
2. I wanted the tank low-level indicator to work, as the WRX gauge cluster does not have the low-level indicator (amber LED)
3. I wanted to have a “pump activation light” (green LED) for troubleshooting purposes, as well as to know when the pump has finished cycling, so I can press it again if need be. Pressing the button twice does not make it pump longer, you have to wait for it to finish cycling before you can spray again.
4. I wanted the switch to be close to the shifter, so my left hand never has to come off the steering wheel. The factory STI system switch is located to the left of the steering wheel, and requires you to take your right hand off the shifter to hold the wheel, and then take your left hand off the wheel to activate the switch…. And then return back to your normal driving position every time you want to spray. This is a poor design in my opinion, so I thought I’d fix it.


First things first… disconnect the battery
Image


Passenger seat, rear seat, and door sills must come off
Image

Image


Interior trunk carpet removed
Image


Remove the driver side lower dash to access the foglight wiring and fuse box. You need to vampire clip the following wires from the foglight harness (foglight harness is installed in ALL cars, regardless of whether or not foglights are installed (I don’t have foglights)
Red, Violet, Orange with white stripe, and black (I used a different ground from other electrical work, but you will need to find a black groundwire)
Image


Above the fusebox, you’ll also find the yellow wire with the red stripe. Use heavier gauge wire when you vampire clip into this wire.
Image


Using zip ties, route the wires down the center console and bring them up through these holes
Image


Now, do the exact same thing through the other hole, under the passenger side carpet (4 wires, plus one large gauge wire (10 or 12)….. and then run all 5 wires down the side of the car, under the carpet, by the brake lines. Use lots of zip ties
Image


Run them into the trunk. I found a nice place, just inboard from the RR strut tower. Just ziptie your wires to the factory harness.
Image


This is what it looks like from inside the trunk
Image


Back inside the car, your wires should be coming from both directions. You’ll install the switch to make the connection
Image


Now you’ll need to run your tubing. I found this firewall grommet on the passenger side of the engine bay. One tiny slit with a razor, and it slid right through.
Image


You’ll need to drop down the passenger side lower dash, and the glovebox. You can see where the tubing comes through
Image


Install the check valve, route it through the hood to secure it, and use the “L” tubes to cleanly route the tubing up to the sprayer nozzle
Image

Image


Now route your tubing under the carpet, right along side the wiring
Image

Image

Image


Route your tubing and wiring to the back of the car where the pump is. I took this picture with the trunk OPEN…. Make sure you route it OVER the trunk hinges, or you will likely destroy your work.
Image


I took this picture with the trunk CLOSED. See what would have happened if we routed the wire below the trunk hinges?
Image


Here’s what the inside of the trunk looked like after I wired everything up and ziptied everything
Image


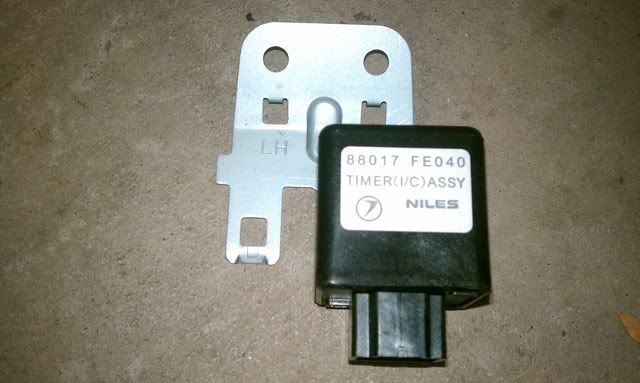
I had to fab up this bracket to secure the front of the tank (GHETTO!!!!)…. I didn’t know I required this part, but I’m on the hunt for the correct part now.
Image

Image


Trunk completed
Image

Image


Interior completed
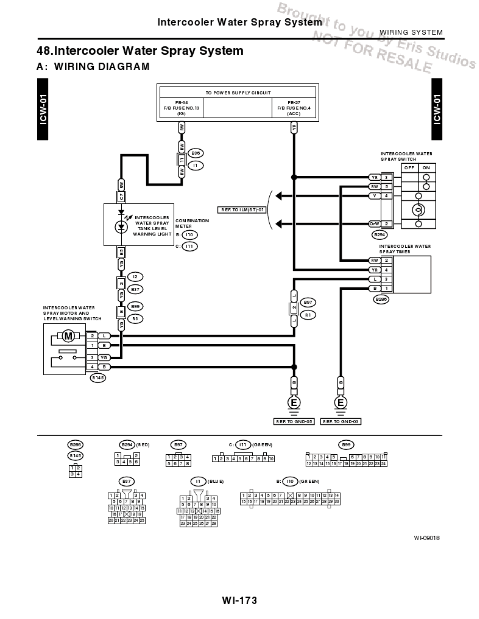
When the level of water in the tank is low:
Image


While the pump is activated (stays on 2-3 seconds only while pump is pumping)
Image
 
#4 · (Edited)
Last but not least (and certainly the most important)….. the wiring.

I spent 2 full days figuring this out…. Sifting through so much internet garbage… only to discover it was done the wrong way. I did manage to get bits and pieces of correct information, but it was few and far between, and coupled with additional incorrect information. It made it extremely difficult to decipher what was right, and what was wrong.
Here’s the factory Subaru wiring diagram in an STI. It is correct, but it is “backwards” from how you actually view all the terminals. If you keep that in mind, you’ll be fine. Subaru views the terminals as if you were looking at them from the “backside”, but in actuality, when installing them, you see them from the front.
Image


However…. This is a FACTORY STI wiring diagram…. So it’s not really meant to be used as a “transplant”. Plus, it doesn’t include the extra indicator lights I added. So…. I created this wiring schematic… based upon the actual pictures I took. Hopefully it helps, and it’s easy to read.

To explain it as best I can:

1. Orange wire w/ white stripe – goes from foglight harness to switch
2. Violet wire – goes from foglight harness to switch
3. Yellow wire with red stripe – goes from above the fuse box, to switch. Must be spliced and go to timer/relay as well. Must have fuse prior to relay (use 12 ga wire)
4. Black wire (ground) goes from under dashboard (any suitable ground wire) to the neg wires on both LED indicator lights
5. Red wire – goes from foglight harness to low-level indicator
6. Amber wire – goes from low-level indicator to amber LED
7. Turquoise wire – trigger wire goes from switch to timer/relay
8. Green wire – goes to both pump, as well as green LED
9. Ground
10. Ground (I grounded 9+10 together into the factory taillight harness)

***** Wires #3, #8, and #9 should be heavier gauge wire (12-16).... I used 24 gauge for everything else.

Image


That’s it….. Hope it helps….. and I hope you enjoyed it!!!!!
 
#8 ·
Fantastic! :thumbup:

Now I have a nice shopping list for my Christmas money. Although I'm not sure where I'll be able to dig up the trunk liner. Look around for a parts car I suppose? Perhaps I could relocate the tank into the fender where my intake silencer used to be. There's lot of space in there now, just need to extend the filler hole into the engine bay...
 
#9 · (Edited)
Milennium auto parts.... they will sell you a trunk liner (carpet), switch, tank, and pump for about $150. That is the MOST you should ever pay for it. They do NOT include the relay though.... which in my opinion, is a necessity. I don't want to have to "hold" the button down to spray, while I'm trying to focus on the track.

check ebay... local sales, etc :)

I bought the tank, pump, and carpet from a local guy for $70

The switch was $20 on ebay

The relay is OFTEN skipped, because it is expensive, and no one sells it used. Not to mention, there is a HUGE lack of information out there about it. Most people don't even know it exists. From Subaruparts.com it was about $60 shipped.

The wire terminals were the toughest to find.... and CRAZY expensive for what you get... unfortunately they are a necessity. The guys at NAPA freaked out when they saw the price of them ($1.40 a piece). They ended up hooking me up, and selling them to me under a dealer account for $1.00 a piece.

Check valve was $6.00 from Subaru

Sprayer nozzle was like $12.00 from Subaru.

everything else.... was just extemporaneous supplies.... maybe another $25 or so??
 
#11 ·
You know what? I have no idea where it is located on the factory STI. I wish I could help, but I honestly have no idea where it is located.

Maybe call Subaru, give them the part number, and see if they can track down it's location?
 
#14 ·
Thanks man! Its good to see someone used it!

Funny story... I actually used this thread as an example of instructional media that I created..... For one of the assignments in my my masters program a few months ago
 
#15 ·
A year and a half later, and you're saving me in more ways that you think XD I will be bookmarking this, and it'll be my biggest reference for my install! I'll be installing it in the stock position, and I'll run the lights through the blank space next to it where the headlight angle adjustment would be. Thanks for the awesome write up, now I know what else I need!!
 
#16 ·
Awesome!! Thanks!!!!

I never did get to do a video..... boo hoo on me I guess.

Sprayer still works 100% though
 
#17 ·
Quick question...what happens if I have foglights? Does tapping the foglight harness have any other effects?
 
#18 ·
Uhhhhh.... to the sprayer? No.

To the foglights? Not sure - LOL
 
#20 ·
Finished! Took a few liberties on location and technique, but she's all finished! I'll upload pictures in a few minutes, but I figured I'd ask the guy that designed the way to wire it in, does your low level sensor work when the headlights aren't on? Mine only works when the lights are ON, the left stick is clicked forward twice. The spray indicator works all the time, but not the low level....

ANYWAY, great write up, I was able to do it over a few days, and I love it! Thanks for being so thorough and clear, Install seemed simple with this in front of me!
 
#21 ·
Image


Image


Image


Image


I still have to put the nozzles in, but I can't because my current STI splitter is off of an '04 STI and I need to cut it to make it fit. I love the look of the 3 buttons and the blank spot all being used on the dash :cool: I'll try to figure out the low level sensor soon, but thanks for everything! I love it so much.

P.S. The sprayer relay hides behind the glovebox in STI's from the factory :) Picked mine up cheap because the guy found it way after selling the rest of the kit.
 
#22 · (Edited)
Nice job!!!!

That's interesting about the low level/headlight thing. To answer your question..... I have no idea.

I never turn my headlights off.... ever..... and the low-level light has only come on once since I installed the system.... I generally check it often and keep it full.

If I made a mistake..... post it up though.... I'm not ashamed.... I'm curious.
 
#24 ·
The stock cluster doesn't have a spray indicator light, so you'd have to use an LED if you want one. What year STI cluster and what year wrx?
 
#27 ·
It works perfectly with my car, and I have fog lights. The glow of the three buttons on the left of the steering wheel is gone for me, and I never figured out why, but I don't see how having fog lights or not would change that, I think I just have a bad ground somewhere. Just a heads up, in case that happens.

Moral of the story: Fog lights or no fog lights, DO IT.
 
#30 ·
^^^^^ I would love to know how you came up with those numbers.

Seriously.... I'm curious.