

2011 Sedan COBB Tuning SF Intake, Airbox, & Stage 1+SF Tune Review (Pics & Vids)
***Finally got a chance to post this review on this forum***
2011 STI Sedan COBB Tuning SF Intake and Airbox.
I purchased the intake and airbox from COBB Tuning @ this link - http://www.cobbtuning.com/products/?id=5884
I received it in 3 days, it came in on a Tuesday and I have night class on Tuesday. It was torture waiting through class but I bit the bullet and made it through. I started to install the Intake and Airbox around 9:30 P.M. and finished around 11:00 P.M.. It would've taken about an hour only but it was dark and that made it a little bit harder.
So when I got out of class I rushed home and began the install. It was dark and I was so excited that I forget to snap a pic of what's included in the box. Here is a pic of exactly what was sent.
![Image]()
It was packed very safe and snug in the box. I opened everything up and laid it out. I separated the airbox pieces from the intake pieces and started to read over the instructions. The instructions are spot on and very easy to understand. They include pictures on each step to give you an idea that what your doing is correct. These instructions could be read by a ten year old and installed by one as well. They get an A+ from me!!
All the parts were very well developed and all the pieces were in perfect shape. Taking out the stock pieces is very simple to do. If I recall correctly, all you are doing is unscrewing/unbolting/un"tabbing" around 4-5 bolts/screws/tabs. The Stock Air Ram Scoop is reused with the airbox/intake which is something a lot of intake companies just toss out. Its nice to see this incorporated into this setup.
Now onto putting it on. The factory pieces are removed and the instructions tell you to add the rubber guarding to the airbox. This step means you have to cut the rubber and fit it around the air box. Its very easy to do. The great thing about it is you don't about to be perfect when you cut because I had around 4 inches of rubber guarding left over. That's a great plus because it takes away the stress of trying to get the cuts perfect. The air box goes in and the COBB bracket is screwed in, then the tube and filter. VERY SIMPLE INSTALL!!
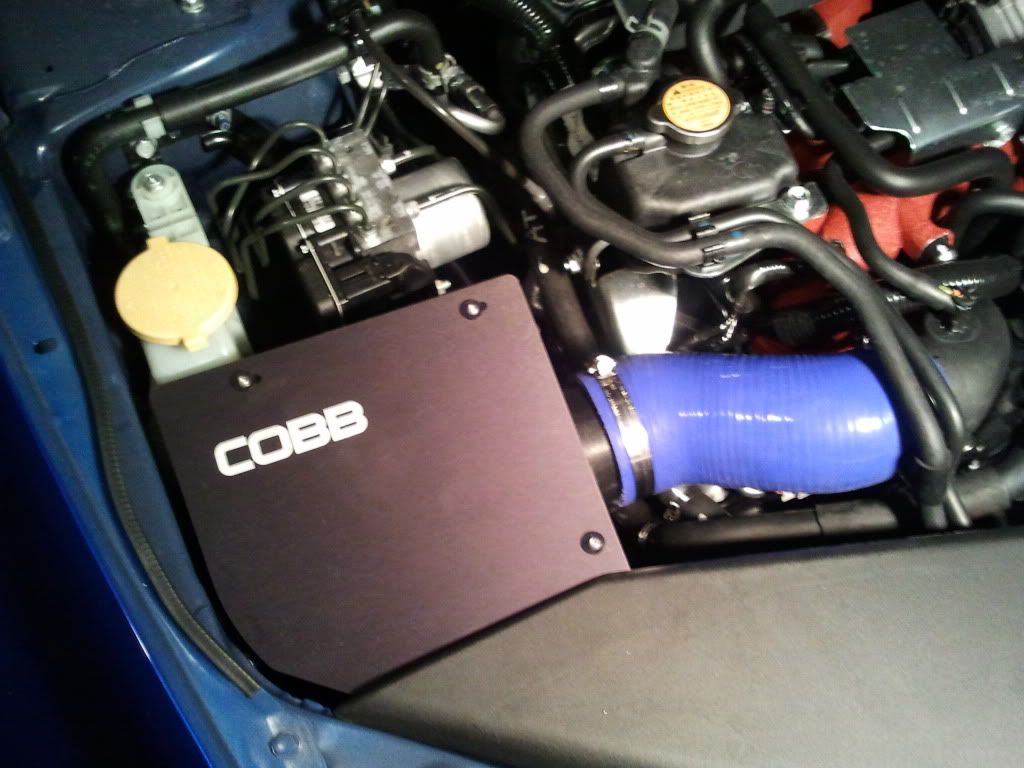
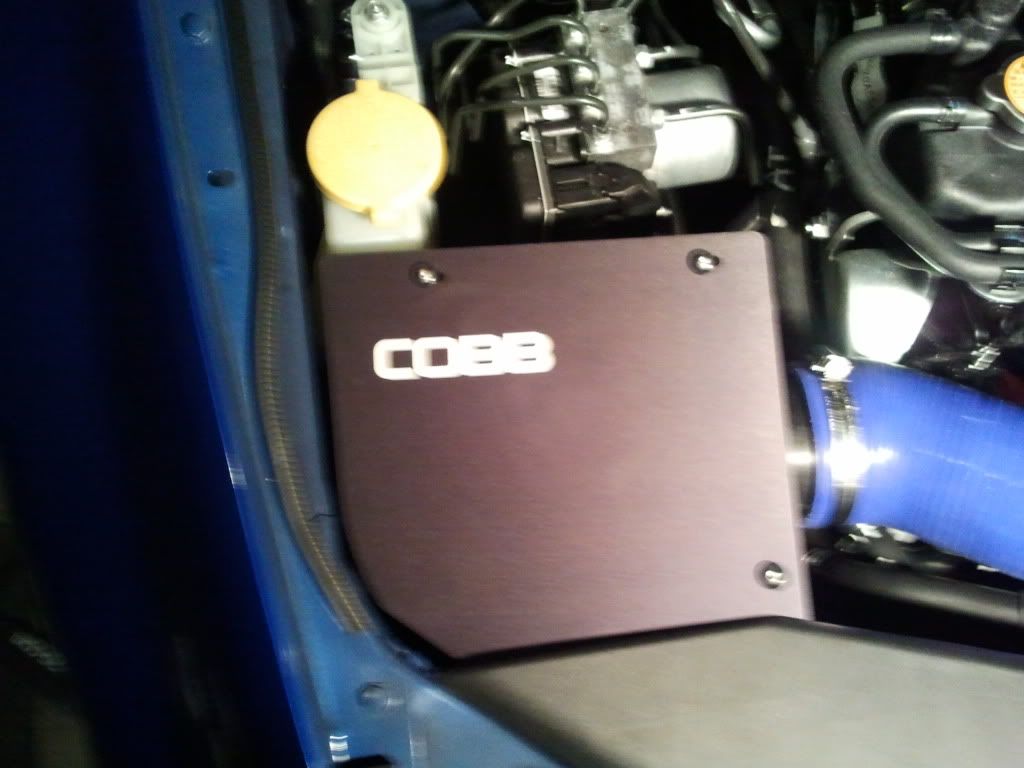
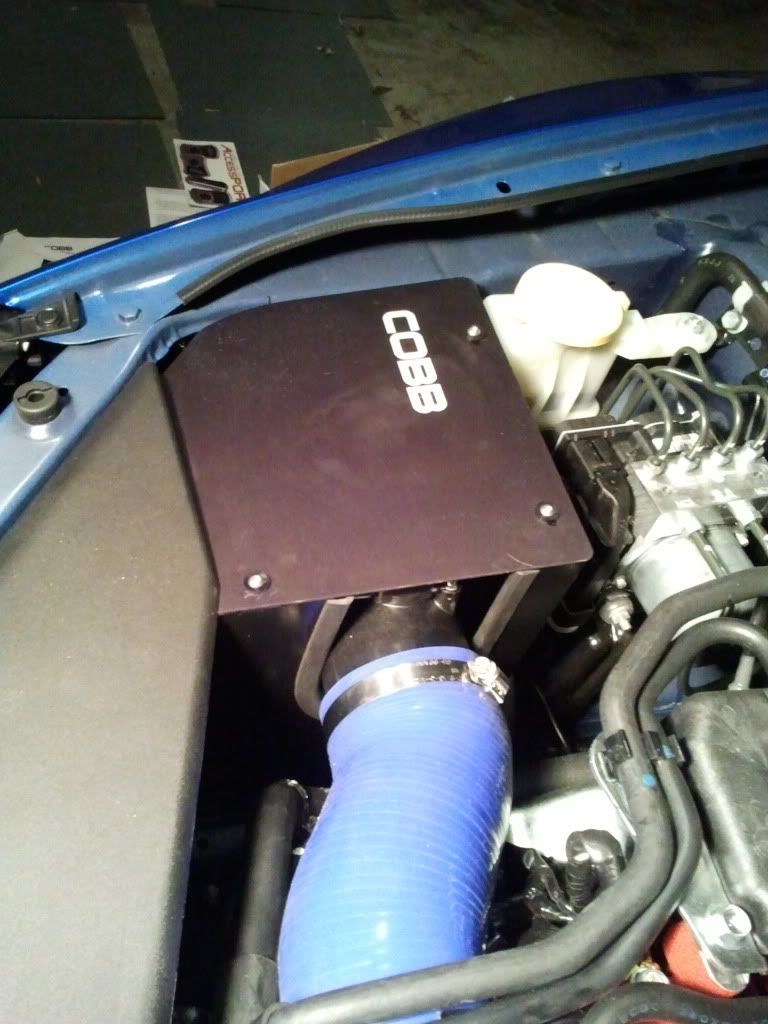
The Finish of the COBB Airbox is a nice brushed black color with a bright brushed silver "COBB" logo on it. It looks very sleek! The Blue Air Tube is the COBB Blue and livens up the engine bay nicely.
When I had everything in place I tightened down everything and reinstalled the stock air ram. A few things I would like to note about the install.... COBB includes new screws/bolts/washers for everything, this is a nice touch. The MAF Sensor even has supplied new screws as well. The fit of the intake was spot on. MAF Housing fit well, the hose fit well, and the intake tube lined up with the filter perfect. They even include nylon washers so vibrating parts don't scratch the airbox, Very nice touch!! The design of this intake was spot on.
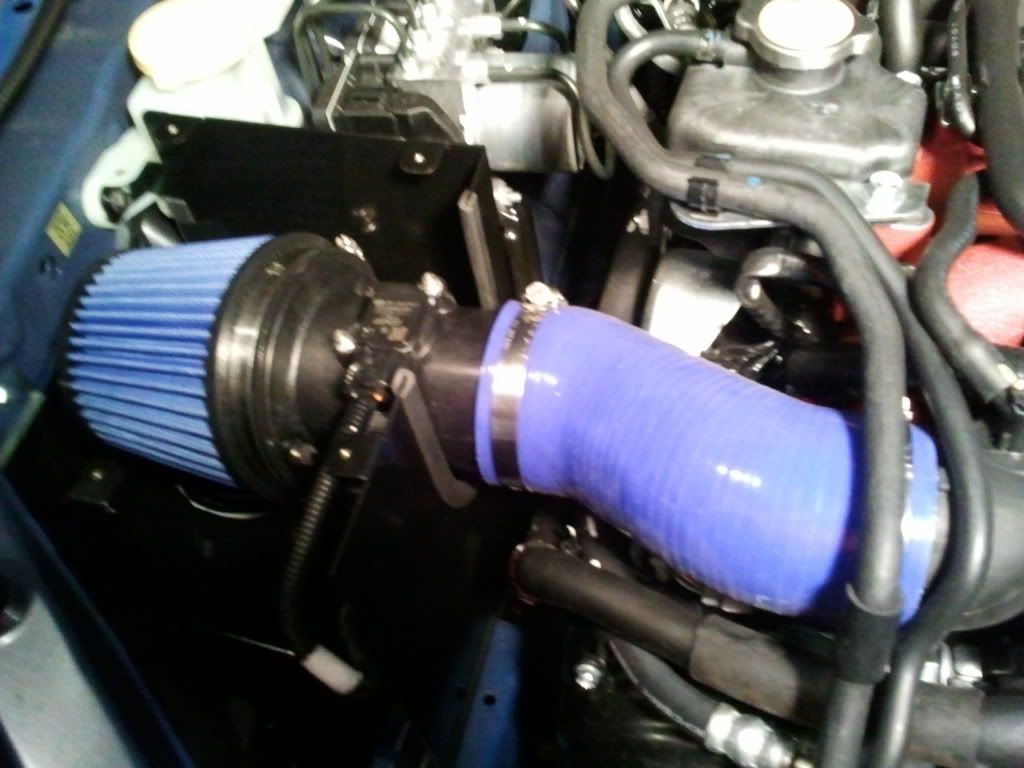
Here are some pictures of the install with the airbox cover off:
![Image]()
![Image]()
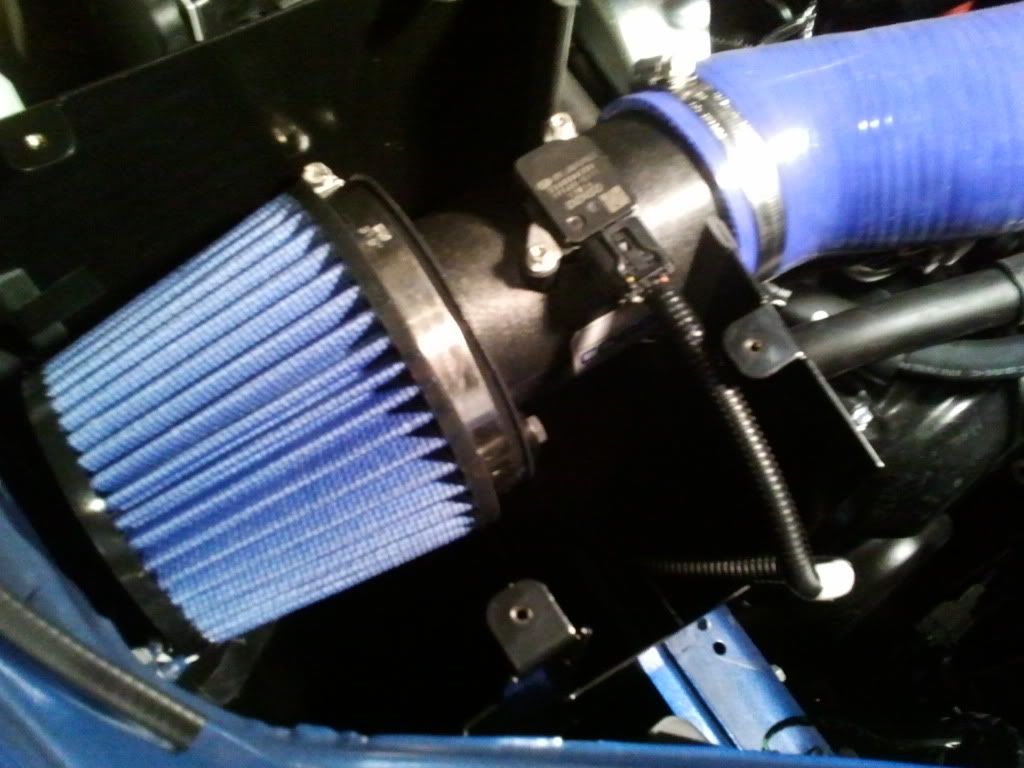
Here is the filter installed up close:
![Image]()
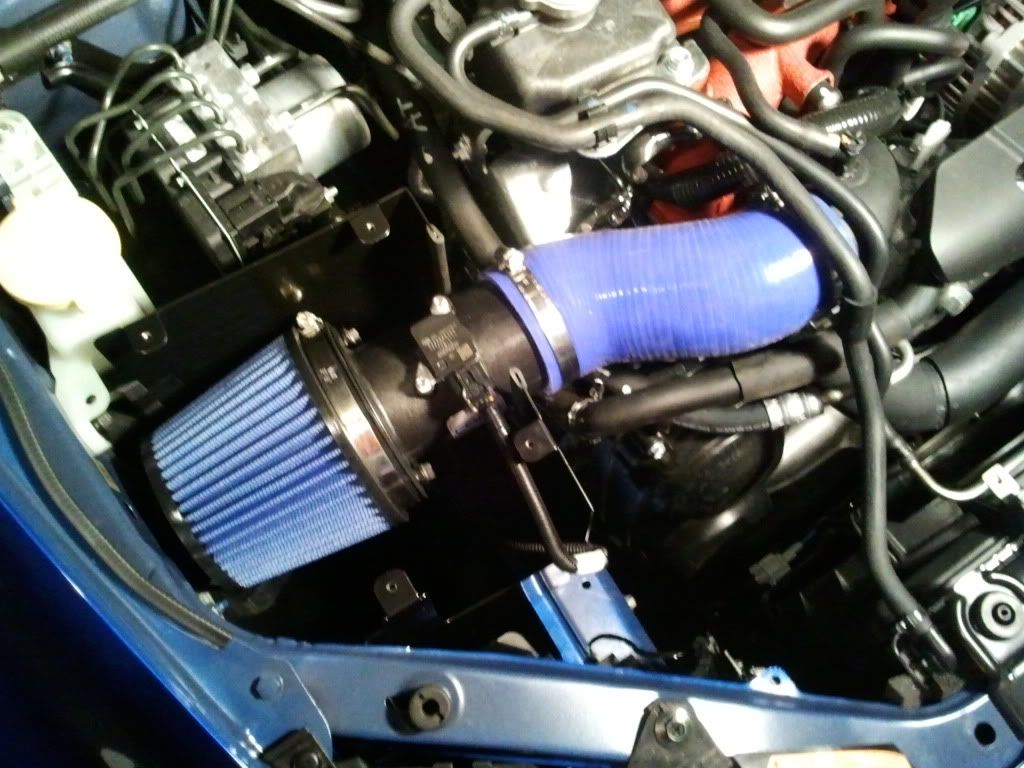
Here are some different angles of the COBB Intake and Airbox installed completely:
![Image]()
![Image]()
![Image]()
AFTER INSTALL:
When I was finished installing the intake/airbox combo I went and got my handy dandy COBB AccessPORT and loaded the "Stage 1 + SF intake" Map. After I loaded the map I started it up for a test drive. * now remember its around 11:30 P.M. now so I cant really rip it at this point* When I took off something I didn't expect happened that blew my mind. It was the sound! It was GREAT! You can hear the Turbo Spool up and the Stock BPV Release its pressure. Like I said, I wasn't expecting it to sound like that and I tell you this... I was addicted to running through the gears immediately. The next day on the way to work I got to test it out fully. As I was running through the gears I noticed that the engine gets a little bit deeper as all intakes usually sound. It was a deeper roar than before.
One thing I liked about the new sound is I can tell when my boost is going to start and that helps me drive without looking at my gauges. That really helps driveability.
POWER:
Now when you load the new stage 1 map you can see that you gain some HP but lose a small amount of TQ. I actually felt that the car is just a bit faster. I could NOT feel a difference in the TQ. The power is there and will increase as you add other supporting mods to your STI. The AirBox makes the intake a Cold Air Only intake. Its the best of both worlds because you don't have to worry about a filter sitting below, inside the bumper and getting water around it. Cold Air is better for power so this is another positive with this intake system. It also makes it easier to access the filter when it needs maintenance.
Overall Impression:
When it comes to intakes, people choose them usually for 3 different reasons.
A.) Trying to increase Power
B.) Trying to better the sound of the engine
C.) Eye Candy for the Engine Bay
I am pleased to report that this intake gave me all 3 reasons. My butt dyno feels a difference, The engine sounds UNGODLY PERFECT, and when I pop the hood its nice to look at. I am pleased in every aspect of this product. I always try to think of some type of negative for each product because usually nothing is perfect and I want to give an honest review whether its good or bad... but this product is near perfect! The only negative thing that I can think of now is that the air tube is yet to be offered in black for those that think Blue is not there thing. (but I think there working on that)
And for what everyone's been waiting for ... The VIDEOS!!
I tried to capture the sound as best as I could, See below for videos with the intake installed.
Windows Down:
Cobb Intake STI :: MOV02746.mp4 video by bbeeler12 - Photobucket
Windows Down:
Cobb Intake STI :: MOV02745.mp4 video by bbeeler12 - Photobucket
Windows UP:
Cobb Intake STI :: MOV02744.mp4 video by bbeeler12 - Photobucket
Windows UP:
Cobb Intake STI :: video-2011-02-20-15-29-26.mp4 video by bbeeler12 - Photobucket
This Video lets you hear the sound at different distances away from the camera:
Cobb Intake STI :: MOV02743.mp4 video by bbeeler12 - Photobucket
In this Video I was able to capture the deeper roar of the engine instead of being overtaking by the spool and BPV:
Cobb Intake STI :: MOV02742.mp4 video by bbeeler12 - Photobucket
I really hope that I helped on some members with this review. If you have any questions about the intake combo or the install or about anything, please don't hesitate to ask. If you want a simple mod that benefits in many ways, this intake combo is the mod for you!
***Finally got a chance to post this review on this forum***
2011 STI Sedan COBB Tuning SF Intake and Airbox.
I purchased the intake and airbox from COBB Tuning @ this link - http://www.cobbtuning.com/products/?id=5884
I received it in 3 days, it came in on a Tuesday and I have night class on Tuesday. It was torture waiting through class but I bit the bullet and made it through. I started to install the Intake and Airbox around 9:30 P.M. and finished around 11:00 P.M.. It would've taken about an hour only but it was dark and that made it a little bit harder.
So when I got out of class I rushed home and began the install. It was dark and I was so excited that I forget to snap a pic of what's included in the box. Here is a pic of exactly what was sent.

It was packed very safe and snug in the box. I opened everything up and laid it out. I separated the airbox pieces from the intake pieces and started to read over the instructions. The instructions are spot on and very easy to understand. They include pictures on each step to give you an idea that what your doing is correct. These instructions could be read by a ten year old and installed by one as well. They get an A+ from me!!
All the parts were very well developed and all the pieces were in perfect shape. Taking out the stock pieces is very simple to do. If I recall correctly, all you are doing is unscrewing/unbolting/un"tabbing" around 4-5 bolts/screws/tabs. The Stock Air Ram Scoop is reused with the airbox/intake which is something a lot of intake companies just toss out. Its nice to see this incorporated into this setup.
Now onto putting it on. The factory pieces are removed and the instructions tell you to add the rubber guarding to the airbox. This step means you have to cut the rubber and fit it around the air box. Its very easy to do. The great thing about it is you don't about to be perfect when you cut because I had around 4 inches of rubber guarding left over. That's a great plus because it takes away the stress of trying to get the cuts perfect. The air box goes in and the COBB bracket is screwed in, then the tube and filter. VERY SIMPLE INSTALL!!
The Finish of the COBB Airbox is a nice brushed black color with a bright brushed silver "COBB" logo on it. It looks very sleek! The Blue Air Tube is the COBB Blue and livens up the engine bay nicely.
When I had everything in place I tightened down everything and reinstalled the stock air ram. A few things I would like to note about the install.... COBB includes new screws/bolts/washers for everything, this is a nice touch. The MAF Sensor even has supplied new screws as well. The fit of the intake was spot on. MAF Housing fit well, the hose fit well, and the intake tube lined up with the filter perfect. They even include nylon washers so vibrating parts don't scratch the airbox, Very nice touch!! The design of this intake was spot on.
Here are some pictures of the install with the airbox cover off:
Here is the filter installed up close:
Here are some different angles of the COBB Intake and Airbox installed completely:
AFTER INSTALL:
When I was finished installing the intake/airbox combo I went and got my handy dandy COBB AccessPORT and loaded the "Stage 1 + SF intake" Map. After I loaded the map I started it up for a test drive. * now remember its around 11:30 P.M. now so I cant really rip it at this point* When I took off something I didn't expect happened that blew my mind. It was the sound! It was GREAT! You can hear the Turbo Spool up and the Stock BPV Release its pressure. Like I said, I wasn't expecting it to sound like that and I tell you this... I was addicted to running through the gears immediately. The next day on the way to work I got to test it out fully. As I was running through the gears I noticed that the engine gets a little bit deeper as all intakes usually sound. It was a deeper roar than before.
One thing I liked about the new sound is I can tell when my boost is going to start and that helps me drive without looking at my gauges. That really helps driveability.
POWER:
Now when you load the new stage 1 map you can see that you gain some HP but lose a small amount of TQ. I actually felt that the car is just a bit faster. I could NOT feel a difference in the TQ. The power is there and will increase as you add other supporting mods to your STI. The AirBox makes the intake a Cold Air Only intake. Its the best of both worlds because you don't have to worry about a filter sitting below, inside the bumper and getting water around it. Cold Air is better for power so this is another positive with this intake system. It also makes it easier to access the filter when it needs maintenance.
Overall Impression:
When it comes to intakes, people choose them usually for 3 different reasons.
A.) Trying to increase Power
B.) Trying to better the sound of the engine
C.) Eye Candy for the Engine Bay
I am pleased to report that this intake gave me all 3 reasons. My butt dyno feels a difference, The engine sounds UNGODLY PERFECT, and when I pop the hood its nice to look at. I am pleased in every aspect of this product. I always try to think of some type of negative for each product because usually nothing is perfect and I want to give an honest review whether its good or bad... but this product is near perfect! The only negative thing that I can think of now is that the air tube is yet to be offered in black for those that think Blue is not there thing. (but I think there working on that)
And for what everyone's been waiting for ... The VIDEOS!!
I tried to capture the sound as best as I could, See below for videos with the intake installed.
Windows Down:
Cobb Intake STI :: MOV02746.mp4 video by bbeeler12 - Photobucket
Windows Down:
Cobb Intake STI :: MOV02745.mp4 video by bbeeler12 - Photobucket
Windows UP:
Cobb Intake STI :: MOV02744.mp4 video by bbeeler12 - Photobucket
Windows UP:
Cobb Intake STI :: video-2011-02-20-15-29-26.mp4 video by bbeeler12 - Photobucket
This Video lets you hear the sound at different distances away from the camera:
Cobb Intake STI :: MOV02743.mp4 video by bbeeler12 - Photobucket
In this Video I was able to capture the deeper roar of the engine instead of being overtaking by the spool and BPV:
Cobb Intake STI :: MOV02742.mp4 video by bbeeler12 - Photobucket
I really hope that I helped on some members with this review. If you have any questions about the intake combo or the install or about anything, please don't hesitate to ask. If you want a simple mod that benefits in many ways, this intake combo is the mod for you!


