
So I see a lot of questions about swapping out the speakers in WRX/Impreza models. Not much is different in the front of the cars, but this thread will focus on the 08+ models rather than the earlier models.
The biggest thing to understand is that you can't just yank off the doors, drop in speakers, and call it a day. If you add more power to the doors, the speakers move more. more cone movement equals more metal reverberation, and that means distorted sound and less efficient reproduction of the music.
Let's skip over proper (or even basic) sound deadening (it has been covered a few times in here and in car audio forums) and focus on the mechanical aspects of upgrading door speakers. Door disassembly, speaker replacement, adapters, spacers, wiring, etc. Just the basics.
Door Disassembly:
First up, I found digital copies of how to disassemble and reassemble the doors, both front and rear. There are a few minor errors (more below), but overall, the directions are pretty good and there is not too much to be added.
![Image]()
![Image]()
![Image]()
![Image]()
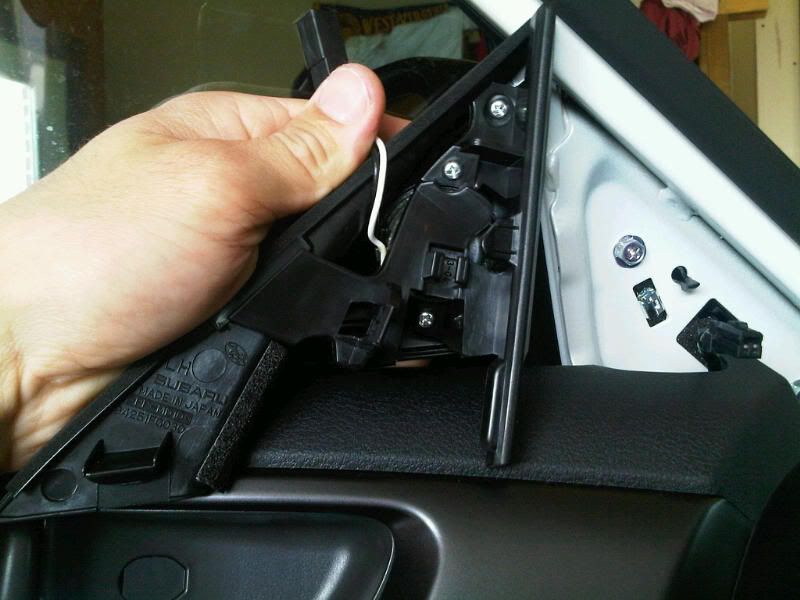
Figure 7 on the Front door diagrams shows the rear door. No big deal.
I found another good thread with some real pictures. It may be good for more info:
2008 Subaru Impreza Hatch Front/Rear Door Panel Removal - NASIOC
Also, I always recommend grabbing plastic prybars from somewhere cheap like Harbor Freight or the local discount auto parts store. They are cheap from HF if you are ordering other stuff, but you might as well buy them locally if you are in a hurry or if they are all that you need to buy. You can see them used to remove the armrest in the pictures above, but they are also good as a panel popper, and for removing the trim around the headunit.
Anyway, the basic disassembly instructions above are pretty good. At least look them over before taking the doors apart.
Spacers/adapters:
Why do you even need door spacers or adapters? Well, your stock speakers have an odd shape. They speakers are contoured to fit the door, and the mounting holes are 3 holes in a roughly triangular shape where the screws go into a nylon insert (as opposed to the inner door skin). This helps prevent the screws from backing out too easily. This is a good thing, so you should try to re-use the stock mounting points. This means that you need some sort of an adapter, because aftermarket speakers typically use 4 mounting holes that are on a different mounting pattern than the stock circle.
In addition to an adapter for the mounting holes, most aftermarket speakers are more robust than the stockers. This means bigger baskets, bigger magnets, and an overall deeper profile. Sometimes, the basket diameter is much larger than the stock ones. You need an adapter that has a larger cutout diameter.
You will also need something that will allow your window to clear the larger magnet assembly on the back of aftermarket speakers. For this, you need a spacer.
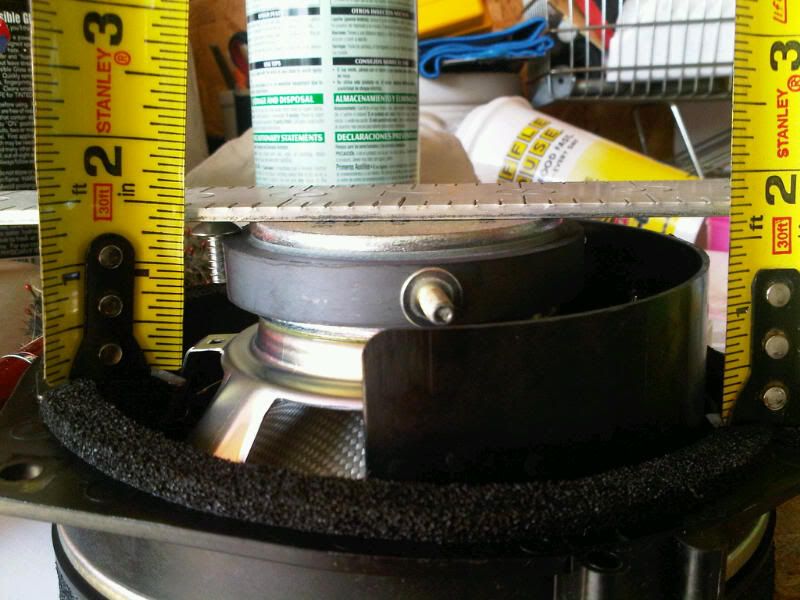
Here is the stock mounting depth in the picture below. As you can see, not very deep. If you don't have a spacer of some sort, you pretty much have the depths below to work with. Really, you only have 1.5" (the shallower depth), because the OEM bracket is angled.
EDIT: I forgot that there is a little space between the window and the OEM speaker, so your max depth (with out a spacer) would be more than 1.5" and WITH a spacer should be fine for most common speakers. Somewhere in the 2.5-2.75" range seems about right. If you have doubts, break out the tape measure and get a reading from the door skin to the window, when it is down (I'll try to do this when I re-open my doors to do more deadening).
![Image]()
Also, I disassembled the OEM bracket to see if it can be reused, but it only allows for a mounting diameter of 4 13/16" for a speaker to drop in. You COULD modify it, but I woudl not. At the end of the day, it is still flimsy ABS plastic, and once modified you can't ever take it back to stock.
No matter what adapter/spacer you get, plastic or a synthetic, non-porous material is preferred. You can get them made from wood, but even if sealed, they can rot, split out, warp, or even mold. This is not a good thing.
As far as type of plastic, you can get injection molded plastic, but it tends to be thinner and more brittle than other options. The preferred material is PVC (just like the pipes) or High Density Polyethylene (HDPE). Either of these are strong, dense, and will withstand the rigors of being in car doors.
You have 2 main options here: DIY or buy a set.
Buying can be from a mass-market vendor or a local shop or individual.
Mass market:
iA and Kartboy are the 2 main companies for the Subaru community. Both are 1-size fits all, and both adapt to the stock mounting holes.
KartBoy spacers are HDPE and are about .5" thick. This helps with the depth, but not enough for all applications. They are well-made, but are 1-size-fits-some.
iA spacers are also 1-size-fots-most, but you get 2 sizes. 1 set is thin- about .25", while the other is about .5". Some people stack them to make a deeper spacer, but then have nothing to use in the rear. Also only 1 cutout diameter. These are made of injection molded plastic.
Of the 2 above, I like the KB ones better, but they were not deep enough for my application, so I made my own.
Local shop or other 1-off source:
If you go with a local shop or contact someone to make you a set, you can get the accuracy of a custom-cut set, which has some sognificant benefits. Just make sure that they use a quality material (see above) and have them made to your specs. Expect to pay the shop their hourly rate for fabrication, plus material costs. They might save you some money on the economy of scale if they have PVC or HDPE for these sorts of projects.
You also might find a friendly forum member (me) who can make them for you, if you ask nicely.
DIY:
To make my own adapters, I used 3/4" PVC (about $30 for a sheet, which is more than enough for a few sets of adapters, but only sold in 8' and 12' lengths. Yes, that was FEET, not inches.). Various widths are are available- I use 7.25" wide material for mine. I used PVC for my WRX and in all of my past cars. It works well, does not split or rot, and was easy to work with. The 3/4" depth has worked well for 95% of speakers that I have seen.
The tools needed to make your own depends on what you have available. You need a drill for the mounting holes, but otherwise you can be flexible.
I use a fly cutter in a drill press for the center cutout, then a drill press for the mounting holes, then a bandsaw to cut the outer perimeter. You can do them with a router and a hand drill, a coping/jig saw, whatever you have. The material is not cheap (about the cost of buying a set), but you'll have leftover material, even if you mess up a few times.
I make them for other people by request, so PM or contact me if you need a set made and don't want to DIY.
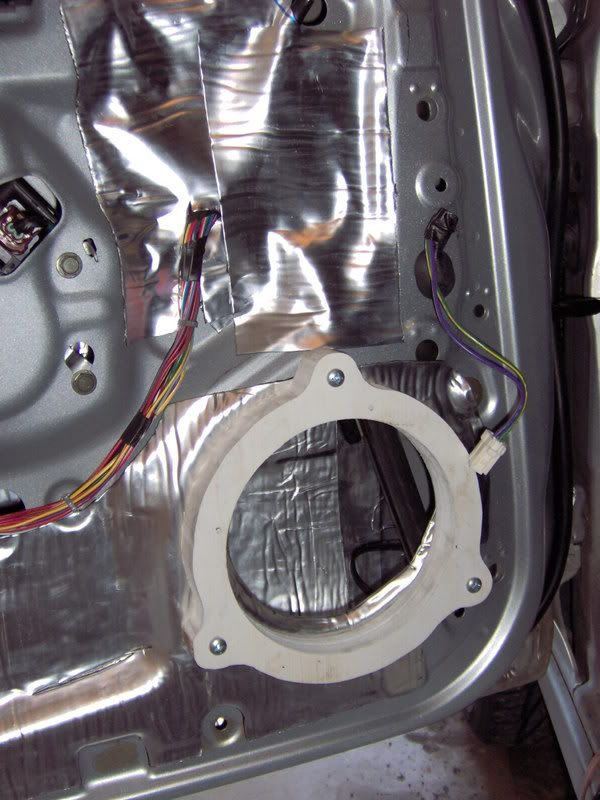
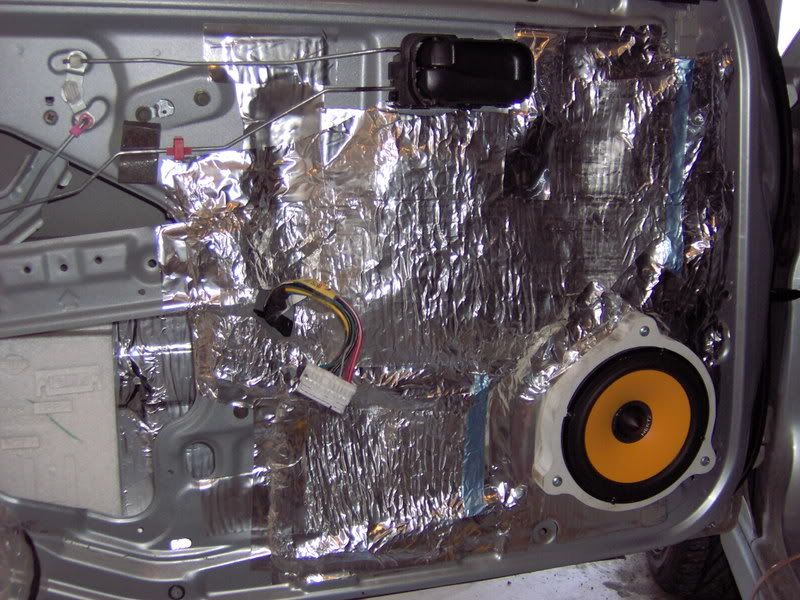
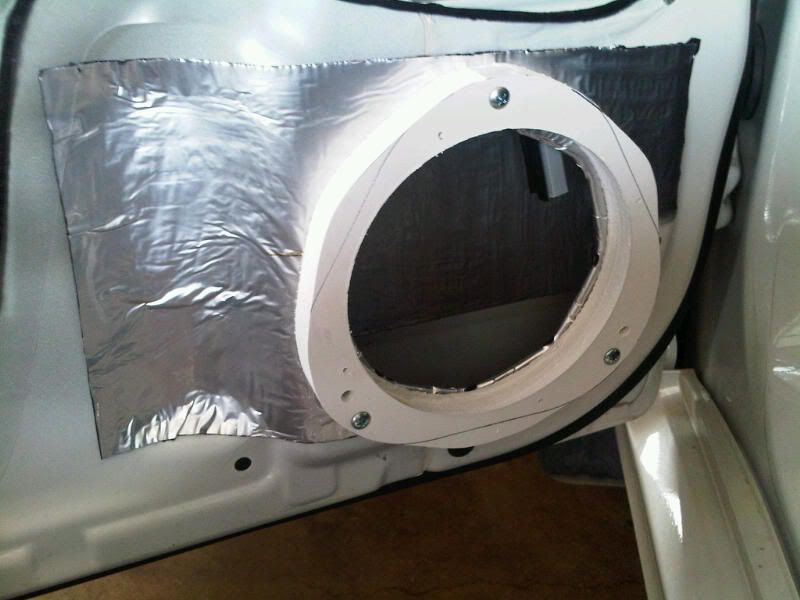
Here are some that I made, which I finally installed recently. Obviously, this is without the speaker:
![Image]()
Wiring:
You will need to either run new wire from your amplifier/headunit to your speakers, or you can use the stock wiring (definitely fine for running speakers off of the HU).
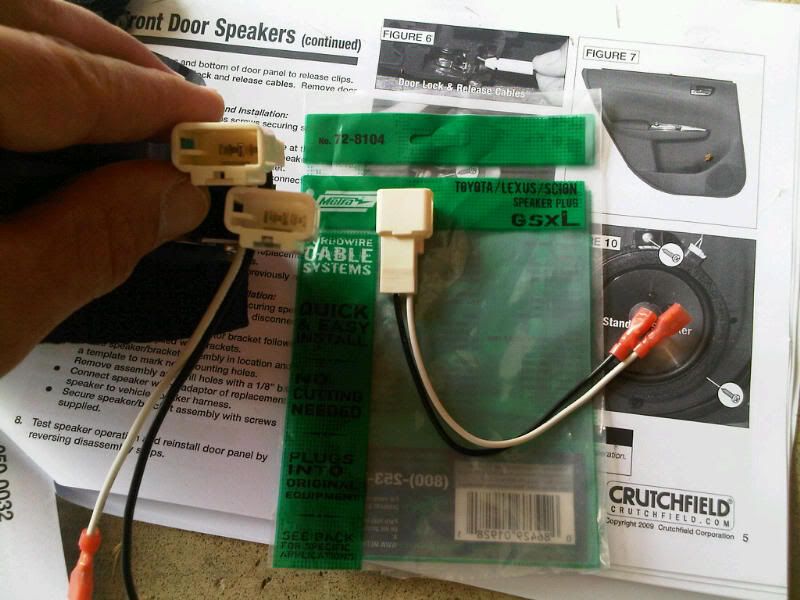
If you re-use the stock wiring, you will need an adapter to get from your stock connector to the terminals on your speakers. You can get them from Crutchfield, BestBuy, etc.
EDIT: According to crutchfield, the 2011 requires 2 pairs of the adapters below:
You need Metra 72-8104
Toyota Speaker Harnesses Speaker adapter plugs at Crutchfield.com
![Image]()
/edit
If you decide to add an amp, you'll need to add wiring from the amp to the speakers in the door, wither direct with a 2-wire traditional speaker wire (for coaxials or if you have components with the crossover in the door) or a 4-wire setup if you put the crossover in the passenger compartment. In-wall speaker wire is good for this. You want a 16/4 wire or a 12/4 wire, both of which are 4 insulated wires in a single sleeve. 16 gauge is smaller than 12 gauge, FYI.
Large zipties are good for snaking the wire through the stock wire boot between the kickpanels and the door.
The biggest thing to understand is that you can't just yank off the doors, drop in speakers, and call it a day. If you add more power to the doors, the speakers move more. more cone movement equals more metal reverberation, and that means distorted sound and less efficient reproduction of the music.
Let's skip over proper (or even basic) sound deadening (it has been covered a few times in here and in car audio forums) and focus on the mechanical aspects of upgrading door speakers. Door disassembly, speaker replacement, adapters, spacers, wiring, etc. Just the basics.
Door Disassembly:
First up, I found digital copies of how to disassemble and reassemble the doors, both front and rear. There are a few minor errors (more below), but overall, the directions are pretty good and there is not too much to be added.


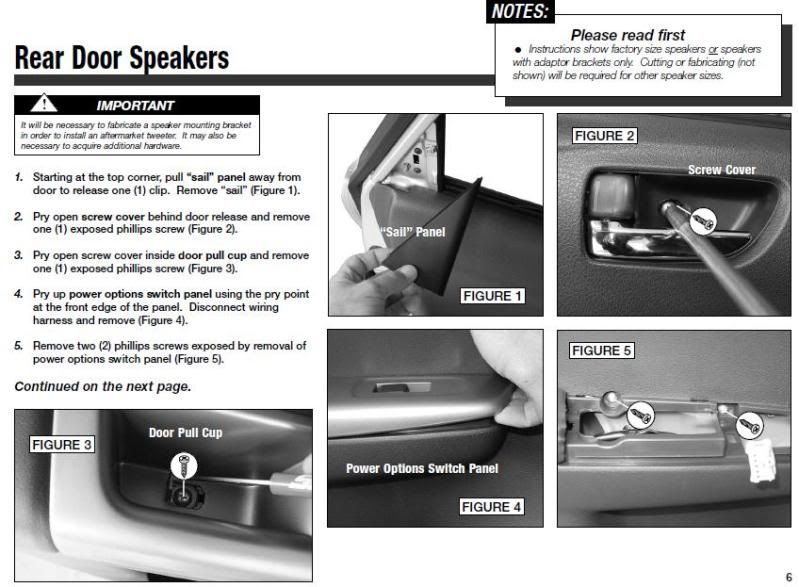

Figure 7 on the Front door diagrams shows the rear door. No big deal.
I found another good thread with some real pictures. It may be good for more info:
2008 Subaru Impreza Hatch Front/Rear Door Panel Removal - NASIOC
Also, I always recommend grabbing plastic prybars from somewhere cheap like Harbor Freight or the local discount auto parts store. They are cheap from HF if you are ordering other stuff, but you might as well buy them locally if you are in a hurry or if they are all that you need to buy. You can see them used to remove the armrest in the pictures above, but they are also good as a panel popper, and for removing the trim around the headunit.
Anyway, the basic disassembly instructions above are pretty good. At least look them over before taking the doors apart.
Spacers/adapters:
Why do you even need door spacers or adapters? Well, your stock speakers have an odd shape. They speakers are contoured to fit the door, and the mounting holes are 3 holes in a roughly triangular shape where the screws go into a nylon insert (as opposed to the inner door skin). This helps prevent the screws from backing out too easily. This is a good thing, so you should try to re-use the stock mounting points. This means that you need some sort of an adapter, because aftermarket speakers typically use 4 mounting holes that are on a different mounting pattern than the stock circle.
In addition to an adapter for the mounting holes, most aftermarket speakers are more robust than the stockers. This means bigger baskets, bigger magnets, and an overall deeper profile. Sometimes, the basket diameter is much larger than the stock ones. You need an adapter that has a larger cutout diameter.
You will also need something that will allow your window to clear the larger magnet assembly on the back of aftermarket speakers. For this, you need a spacer.
Here is the stock mounting depth in the picture below. As you can see, not very deep. If you don't have a spacer of some sort, you pretty much have the depths below to work with. Really, you only have 1.5" (the shallower depth), because the OEM bracket is angled.
EDIT: I forgot that there is a little space between the window and the OEM speaker, so your max depth (with out a spacer) would be more than 1.5" and WITH a spacer should be fine for most common speakers. Somewhere in the 2.5-2.75" range seems about right. If you have doubts, break out the tape measure and get a reading from the door skin to the window, when it is down (I'll try to do this when I re-open my doors to do more deadening).
Also, I disassembled the OEM bracket to see if it can be reused, but it only allows for a mounting diameter of 4 13/16" for a speaker to drop in. You COULD modify it, but I woudl not. At the end of the day, it is still flimsy ABS plastic, and once modified you can't ever take it back to stock.
No matter what adapter/spacer you get, plastic or a synthetic, non-porous material is preferred. You can get them made from wood, but even if sealed, they can rot, split out, warp, or even mold. This is not a good thing.
As far as type of plastic, you can get injection molded plastic, but it tends to be thinner and more brittle than other options. The preferred material is PVC (just like the pipes) or High Density Polyethylene (HDPE). Either of these are strong, dense, and will withstand the rigors of being in car doors.
You have 2 main options here: DIY or buy a set.
Buying can be from a mass-market vendor or a local shop or individual.
Mass market:
iA and Kartboy are the 2 main companies for the Subaru community. Both are 1-size fits all, and both adapt to the stock mounting holes.
KartBoy spacers are HDPE and are about .5" thick. This helps with the depth, but not enough for all applications. They are well-made, but are 1-size-fits-some.
iA spacers are also 1-size-fots-most, but you get 2 sizes. 1 set is thin- about .25", while the other is about .5". Some people stack them to make a deeper spacer, but then have nothing to use in the rear. Also only 1 cutout diameter. These are made of injection molded plastic.
Of the 2 above, I like the KB ones better, but they were not deep enough for my application, so I made my own.
Local shop or other 1-off source:
If you go with a local shop or contact someone to make you a set, you can get the accuracy of a custom-cut set, which has some sognificant benefits. Just make sure that they use a quality material (see above) and have them made to your specs. Expect to pay the shop their hourly rate for fabrication, plus material costs. They might save you some money on the economy of scale if they have PVC or HDPE for these sorts of projects.
You also might find a friendly forum member (me) who can make them for you, if you ask nicely.
DIY:
To make my own adapters, I used 3/4" PVC (about $30 for a sheet, which is more than enough for a few sets of adapters, but only sold in 8' and 12' lengths. Yes, that was FEET, not inches.). Various widths are are available- I use 7.25" wide material for mine. I used PVC for my WRX and in all of my past cars. It works well, does not split or rot, and was easy to work with. The 3/4" depth has worked well for 95% of speakers that I have seen.
The tools needed to make your own depends on what you have available. You need a drill for the mounting holes, but otherwise you can be flexible.
I use a fly cutter in a drill press for the center cutout, then a drill press for the mounting holes, then a bandsaw to cut the outer perimeter. You can do them with a router and a hand drill, a coping/jig saw, whatever you have. The material is not cheap (about the cost of buying a set), but you'll have leftover material, even if you mess up a few times.
I make them for other people by request, so PM or contact me if you need a set made and don't want to DIY.
Here are some that I made, which I finally installed recently. Obviously, this is without the speaker:
Wiring:
You will need to either run new wire from your amplifier/headunit to your speakers, or you can use the stock wiring (definitely fine for running speakers off of the HU).
If you re-use the stock wiring, you will need an adapter to get from your stock connector to the terminals on your speakers. You can get them from Crutchfield, BestBuy, etc.
EDIT: According to crutchfield, the 2011 requires 2 pairs of the adapters below:
You need Metra 72-8104
Toyota Speaker Harnesses Speaker adapter plugs at Crutchfield.com
/edit
If you decide to add an amp, you'll need to add wiring from the amp to the speakers in the door, wither direct with a 2-wire traditional speaker wire (for coaxials or if you have components with the crossover in the door) or a 4-wire setup if you put the crossover in the passenger compartment. In-wall speaker wire is good for this. You want a 16/4 wire or a 12/4 wire, both of which are 4 insulated wires in a single sleeve. 16 gauge is smaller than 12 gauge, FYI.
Large zipties are good for snaking the wire through the stock wire boot between the kickpanels and the door.